How to Make Shaving Cream Easter Egg Dye

This is how you can make some awesome marbleized looking Easter Eggs quickly and easily, without a lot of mess and spending a lot of money. Here’s what

Source: How to Make Shaving Cream Easter Egg Dye

I found a link on pinterest the other day that I just thought “Ooh, eggs and shaving foam”, pinning it for another day. Then I thought, let’s actually look at the method! It looks so, so simple. We’ve been planning on trying to make natural dyes (raspberries, coffee, etc) to paint some eggs here in school, but this method is much simpler and easier to put together.

In fact, I’ve put the ingredients on my shopping list to try at home!

Happy Easter!

Circulatory System Lesson

Heart Pumping Model

Circulatory System Lesson. / How to Make a Human Heart

I found this a while ago, but still haven’t got around to trying it out. The picture looks like it should be a really good heart model, and if it means that we don’t have to use any of our budget to buy a working heart model, well it must be good. Right?

The equipment is all stuff that you can easily find at home (recyclable material, too) so also easy that you could save enough to get a whole class or STEM group to do. And, of course, there’s the option of doing it at home just for fun or extra credit work.

This is one we need to try in the summer!

Fun Science Experiment! – Learning how plants absorb water! –

Coloured Cabbage Leaves

Fun Science Experiment! – Learning how plants absorb water! –.

I want to bring this blog to note because I think it would be far more cost effective when we usually demonstrate how plants absorb water. Normally, we buy a bunch of flowers and either put them all in one vase of artificially coloured water, or separate them between two colours. Normally only blue and red. We might also do the same with a packet of celery. Celery is good because you can cut the stem and see the colour going all the way through.

However, I was drawn to this particular blog and the idea from a photo of cabbage leaves in different coloured water. With celery, only blue and red ever tend to really work, visibly. Well, Paging Fun Mums has clearly got red, blue, green and yellow to work amazingly well with cabbage leaves. I also think that it would be far easier to ensure a whole class could set up their own set as a cabbage would go further than a bunch of flowers. They were apparently only left overnight, which is probably what we would do.

I just really want to try the cabbage!

Balloon Greenhouse | Activity | Education.com

Growing Balloons

Balloon Greenhouse | Activity | Education.com.

I found this on pinterest and am so intrigued to see how well this works. Ellen, the author, suggests using radish seeds, but I’m wondering if in a STEM environment it might be more useful and cost effective to use cress seeds. We’ll have to try it out with that.

I love the fact that you tie off and make a contained “world” within the balloon. I can imagine asking a group what a plant needs to grow and then asking them if the seeds have all of that inside of the balloon.

I also love the idea of also growing the plant outside of the balloon, to see how the balloon affects the growth.

Could this also work on a larger scale to demo phototropism? Paint the balloon all over, or on one side. Or just use a dark coloured balloon.

I seriously cannot wait to try this!

And of course, this experiment is perfectly suited to be done at home – that’s what Ellen did. We’re just going to adapt it for inside of education. Or try to!

How to Make Magnetic Slime – Frugal Fun For Boys

Homemade Magnetic Slime

How to Make Magnetic Slime – Frugal Fun For Boys.

I’m sure that most science departments have a whole array of magnetic toys, we certainly have – we may even have some magnetic slime. However, to be able to make more of the stuff? Even use it as part of a STEM session or get prospective students to make it on a school Open Evening… I think it would be pretty fun.

The ingredients are even simpler to buy if you have access to the school ordering system (at least for the iron oxide!) and who doesn’t have some PVA glue?

I think I’d want to try it out myself before I considered doing it at home with children — the iron oxide and breathing aspect makes me hesitant. I also prefer the idea of the slime over putty as think it would be more visual. Especially on an Open Evening in the Physics room!

Viscosity experiment for kids

Viscosity Testing

Viscosity experiment for kids.

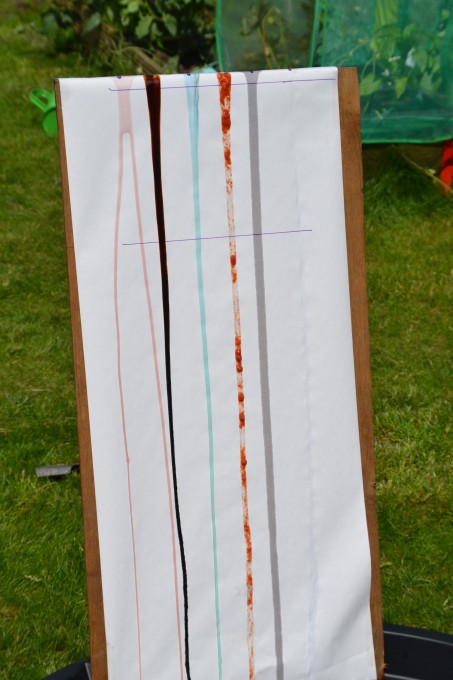
This would be awfully messy to do at home, in school or as STEM, but isn’t science supposed to be messy and fun?

In the blog, different home-found liquids were used to test their viscosity in a simple ramp race. They used oil, water, passata, corn syrup, treacle and ice cream sauce. I love those options! I might change passata for ketchup and try other table sauces, too, even possibly different brands of one table sauce. Just to stretch the STEM Club into thinking a bit harder! It’ll be just as messy as the syrup one we currently do (syrup at room temperature, from the fridge and warmed in boiling water), but maybe a little bit less sticky. Plus, table sauces come in squeezy bottles and are relatively cheap for all of the waste that will come with it!

Does Aspirin Help Plants Grow? | Education.com

Does Aspirin Help Plants Grow? | Education.com.

I found this on a random google search where I was actually looking for something else and I know that I have found a few plant growth topics, but this one is a bit different.

The standard practice in schools to test plant growth is to use nutrient deficient solutions on already grown plants, or on cress, and we often find that we don’t get amazing results. Through mainly pinterest, I have found “at home” versions where you use water, salt water, sugar water, vinegar, etc – common household liquids. Obviously, if you’re trying to teach the science behind the nutrients themselves that are needed, the “at home” versions won’t help.

If, however, you just want to introduce how plants grow rather than what they need nutrient-wise to grow, then this newly found solution can easily be added on: aspirin!

Apparently there is loads of research into how aspirin can help tomato plants, but this “science fair” topic is about testing aspirin to see if helps plants grow. This would be a lovely add on to the other household liquids that cress seeds could be grown with.

You just have to be careful with the aspirin when it comes to children. Definitely one to add on to the to-do list!

STEM – Blackcurrant Osmosis

Who doesn’t love Ribena? And chips? Okay, maybe not really together as such. I found this experiment through Practical Biology a few years ago, but have only just got around to testing it myself and then putting it into a STEM session. The Practical Biology/Nuffield site have lots of different experiments you can browse through, each with teacher and separate student guidance. I simplified the Blackcurrant Osmosis one for the time and age of the students.

It really is very simple and easy to set up. Also, it’s very visual for students to look at. Here are some of our potato chips after 15-20 minutes in different Ribena concentrations –

Blackcurrant Potatoes

It’s quite obvious which one is 0% Blackcurrant and which is 100%. It’s pretty clear even for the other concentrations. That wouldn’t happen with plain old sugar water, would it?

We did this with a group or KS3 who knew nothing about osmosis, nothing about concentration and had never done a practical quite like this before, but in the hour session they all did pretty well. I think this would be perfectly suited for an hour length lesson especially with the right background knowledge. I would simplify it for a repeat STEM session though and cut all of the chips to perfect size so that step could be cut out completely. I am pretty amazed at how well the year 7s did with making the different concentrations and, from the results, all of the concentrations were made pretty accurately. There was only one group with anomalous results that made no sense!

0% - 80% Strength

It’s all actually quite simple really – make 6 concentrations of blackcurrant squash (from 0% to 100%) (oh, and whilst Ribena works very well, so does the blackcurrant cordial we tried), put a pre-weighed potato chip into each concentration and leave for 15-20 minutes.

Floating Chips

(Note how the chips float with increasing squash concentration. Can you explain that?)

Then, remove each chip, pat them dry and weigh each one again. Then calculate the percentage change in mass.

0% - 100% Chips

The 0% blackcurrant was the only chip to not lose mass as water moved into it from the greater concentration outside of the potato cells. All of the others had water leave the chip via osmosis (to varying extents) as the water concentration was greater within the chips compared to the sugary Ribena.

For younger students, if you leave the chips in long enough they might get enough out of the experiment from just seeing the purple coloured chips. Can they explain it? And then with age/knowledge move on to the theory behind osmosis and the graphing example Nuffield gives.

I’d also like to try their example of altering this experiment to show the rate of water movement. Perhaps that would be better for understanding the basics behind osmosis for younger students.

Fun Absorbing Experiment for kids

Fun Absorbing Experiment for kids.

Sugar Cube Absorbing

I found this through pinterest, simply by the image of three sugar cubes and it got me to wondering… Could this be used to measure a rate? Depending on what the tallest tower is that can be built without the bottom cube collapsing, could you make a stack in a coloured water and time when the colour reaches the end/beginning of a new cube? If you could get to 5, would that be enough points for a graph?