Plant an Odds-and-Ends Garden

Plant an Odds-and-Ends Garden.

Some “at home” ways to grow new vegetables. With beetroot, slice the top off and keep the green shoots attached, rinse it and place it in a shallow dish of water.

With celery, cut a bunch of celery down until you have only 3 inches of the base and put it in a shallow dish of water. Within a week, leaves should be growing out of the center. The advise is to peel away rotting stalks as it grows.

Basil stalks can be put into tall glasses of water (small leaves not submerged) and after a few weeks roots should emerge – this should be good to study and visibly see root growth.

Apparently garlic cloves can be fully emerged in water and roots will appear in a few days, sprouts may take a little bit longer, but still in a clear container this would be perfect and perhaps easier to study root growth.

Cut a washed sweet potato in half and put it in another shallow dish of water. Leaves appear in 2 weeks.

Some of these would be perfect for a STEM session – celery, beetroot and garlic for definite, with the others perhaps taking a bit too long. And of course they’re all amazing ideas for Plant Biology and for doing at home. I have a pin somewhere about other fruits/vegetables that you can re-grow at home so I will try and find that to add to this topic.

Until then, I can try out this one!

Glow Eggs ~ Growing A Jeweled Rose

Glowing Eggs, or Mystical Universe?

Glow Eggs ~ Growing A Jeweled Rose.

I’m always on the look out for fun things to do during or near to holidays. We always do something with iron filings for sparklers near Bonfire Night. We have a make your own copper wire Christmas Tree Buzzer game and Santa Sleigh fun experiments at Christmas.

How about Easter?

Well, Easter is all about the eggs, right? I think we’ve used STEM sessions to dye eggs with natural dyes and then we’ve done standard, run of the mill, egg drop sessions where you have to build a crash mat or parachute. What else can you do with eggs in science?

Apparently, make them glow in the dark! Growing a Jeweled Rose has done it and the photos on their blog are so gorgeous (I’m a sucker for anything “pretty”). They used fluorescent or glow in the dark paint (which I’m sure we have), water and vinegar. That was how they made their dye which could then theoretically be used on anything, but I’d keep for an Easter trial!

This is another fun science experiment that can easily be done at home, too.


Merry Christmas from the Science Learning Centres | National Science Learning Network Blog

Merry Christmas from the Science Learning Centres | National Science Learning Network Blog.

This is a link to two videos from the National Science Learning Centre – both of them linked to Christmas! The first is aimed more at primary aged children with snow and winter in mind. I’m sure you can do it even if you’re older in age (and young in mind perhaps). The video makes it look very simple, perhaps even to get an older set of students to plan it all and experiment themselves with differing amounts/types of salt and watching how fast the ice/snow melts.

I don’t think it would be too difficult to adapt to do at home with younger children either. Especially as nothing involved is hazardous or toxic (if you stick to salt). I’ve always wanted to try ice and salt based activities with normal table salt and reduced sodium salt. Add in rock salt and you have a nice little experiment.

The second video is for secondary aged students and based around experiments you can do at the Christmas table.

Merry Christmas!

The Science Spot: Science Classroom

The Science Spot: Science Classroom has a nifty little collection of Science projects – Element Trading Cards (with worksheets), Bursting Balloons (looking at Charles’ Law) and two Christmas themed activities.

The first one (Christmas Chromatography – Deck the Halls with Science) is something that popped up from a colleague in my inbox over a year ago for a Christmas now long forgotten! The actual link is to a pdf worksheet that can be downloaded and printed, but the basics of it are: draw a bulb, cut it out, put ink on it, make a colourful chromatography bulb to then hang up once they’re all dry. The worksheet comes with handy shapes to use as templates for your bulbs and a method of chromatography using water and pipe cleaners.

Of course, if you have access to coffee filters, you can do this at home and make yourself a pretty garland of “lights” as a family – explaining the science of course!

The science spot page even says that this activity could be adapted for Easter eggs, flowers or rainbows. What other holidays or events could be used? July 4th, perhaps? Valentines hearts, scary Halloween monsters? Maybe fireworks if it was done right. Or, using filter paper pre-cut to form the letters of your school, get students to make them colourful in preparation for or during an Open Evening. Or just to put your teaching name up on the wall!

The second Christmas based activity they have is The Case of the Christmas Cookie Mystery, which I think I have seen before, but never tried. Pdf worksheets and details are available for download and this activity involves testing six powder samples to find the Christmas Cookie Mix. Again, this one can probably be adapted for other holidays, but would make an excellent end of year activity for Science class, STEM session, extended tutor time. Maybe then make your students make a pretty light-bulb garland in the last few minutes of the Christmas lesson!

Merry Christmas!

Invitation to Build: Gumdrop Christmas Trees – Left Brain Craft Brain

Invitation to Build: Gumdrop Christmas Trees – Left Brain Craft Brain.

Build a Christmas Tree

Okay, we’ve done challenges like this before in STEM club – spaghetti towers, marshmallows are far too messy, “buy” different types of building materials. I think one year we did it as part of STEM week and had to balance Creme Eggs on the top of a tower! It had never occurred to me to make this twist and make a Christmas Tree version!

Maybe part of the challenge could be to hold a particular star or tree ornament.

I love how you can adapt the other challenges, involve a planning session to get students to look into the best shapes involved to make a tower and then devote an hour to building a Christmas Tree. I think it would also be incredibly useful in an end of term lesson or even for a tutor-time activity. There might not be time to add it in for this year, but perhaps next year!

Melting Ice Experiment – Inspiration Laboratories

Melting Ice Experiment – Inspiration Laboratories.

Icy Surfaces

I remember seeing a video about melting ice on metal and wood blocks years ago and being simply amazed, and I love the next step that Inspiration Laboratories takes on it. Especially with a Wintery slant.

This would be so achievable in a STEM session, or fun end of term lesson, especially if you then took the worst surface and added salt, rock salt, other harmless white chemical and then compared with surfaces. For example, if metal is the best, can a chemical on a wooden surface make it better than metal?

Could you find enough stones, or a house brick, a paving slab, something akin to tarmac and test “outdoor” surfaces?

STEM – Unlocking the Rainbow

Following on from the Skittles posts recently – Candy Experiments and Fun Experiments. We tried this! Well, we tried the rainbow one again, more accurately this time and we got some amazing results. The Skittles in a petri dish worked just as previous blogs said, some of our STEM Club’s results were amazing –

2014-11-18 15.24.42 2014-11-18 15.25.45 2014-11-18 15.26.45 2014-11-18 15.31.26

We tried it with 3 and 5 coloured Skittles (although I realised far too late that there are not 6 colours of Skittles!) and produced a very simple worksheet for colouring in. I love how the colours don’t mix!

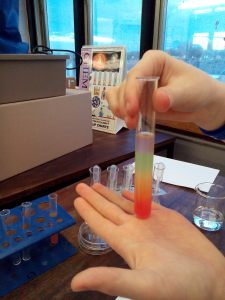
Then we did the density rainbow which certainly involves a very steady hand! But some of our groups managed to make it (after I worried hugely that I had made the solutions wrong!)

2014-11-18 15.36.50

I made a huge batch of the different colours – using 100 red skittles, 75 orange, 50 yellow, 25 green and 5 purple – each in 300ml of just boiled water and left them to dissolve for over an hour. I only opted to do it in that order as somebody I know loves the purple flavour so I saved them! In total we opened 3-4 big bags of Skittles, but it was for a full sized class and there are some left.

I even also now have an extension for this experiment, but it’s an Adults only extension! How about a rainbow of Skittles vodka? Any adult want to try it and let me know how it works?